After you have taken your bracketed series of pictures as described in my previous post, you are now ready to merge these into a ‘High Dynamic Range’ image file. This will be a 32 bit TIFF file that will contain more details of shadows and highlights than you would be able to print or see in a compressed .JPG file. This is where the the HDR software, in my case HDRsoft Photomatix Pro, comes into play.
First Things First
But just before we start importing our selected images into Photomatix, recall what I said about the camera settings for your exposure bracket – that you should turn off your Auto White Balance, how broad you EV range should be, etc.
Review the photos of your series. Check the histograms to see which photos of your series you want to use. I tend to capture too broad a range than actually needed, so looking at the histograms to select which images you should merge to capture the necessary detail and which are simply too over- or underexposed makes sense. The more images you aim to merge in Photomatix the more processing power and time will be required.
Double-check the white balance of each photo and if you forgot to turn off your auto white balance, set all to the same value. This synchronisation of settings is easily done in Lightroom: Select your images, Right-Click, select ‘Develop Settings’ then ‘Sync Settings…’ (or Crtl+Shift+S).

Now Export
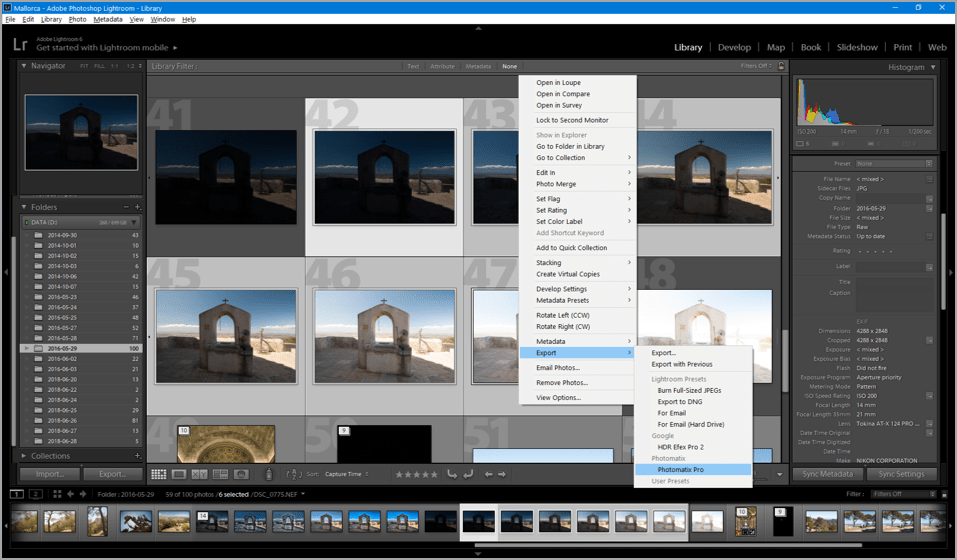
If you use Adobe Lightroom, you will also have installed the Photomatix Pro plugin for Lightroom (this is automatically installed when you install Photomatix). This allows an easy and direct export of your RAW files into Photomatix. Lightroom supposedly does a far better job of converting raw files than Photomatix so this is my preferred approach for this workflow.
To use the Lightroom plugin, highlight the images you want to merge in the Library module and right-click one, select ‘Export’ and then ‘Photomatix Pro’ from the context menu.
You will then be shown a dialogue “Settings for processing exported files”. The preset “On Tripod” is probably best for Interior photography as outdoors wind may lead to ever so slight movement despite using a tripod. I tend to use “Hand-held (minimal movement)” in most cases where I did use a tripod – and “Hand-held (standard)” where I did not. If there were any moving elements in your photo series that you want to rectify, select the “Show dialog with options to remove ghosts” option. Be sure to “Automatically re-import into Lightroom library” and select a naming convention. To maintain maximum quality, use the “TIFF 16-bit” output format.

PhotoMatix DeGhosting
Ghosting happens when something moves during the exposure brackets. People moving around, leaves on trees blown by wind, cars passing by in the background, clouds on a very windy day – or even camera movement causes multiple images–ghosts–in the merged image.
The example image I am using here does not really require any deghosting, so I will merely mention the Photomatix deghosting step in this blog for completeness. I will dedicate a separate blog post to the topic of deghosting in the near future using some images where deghosting was really necessary.
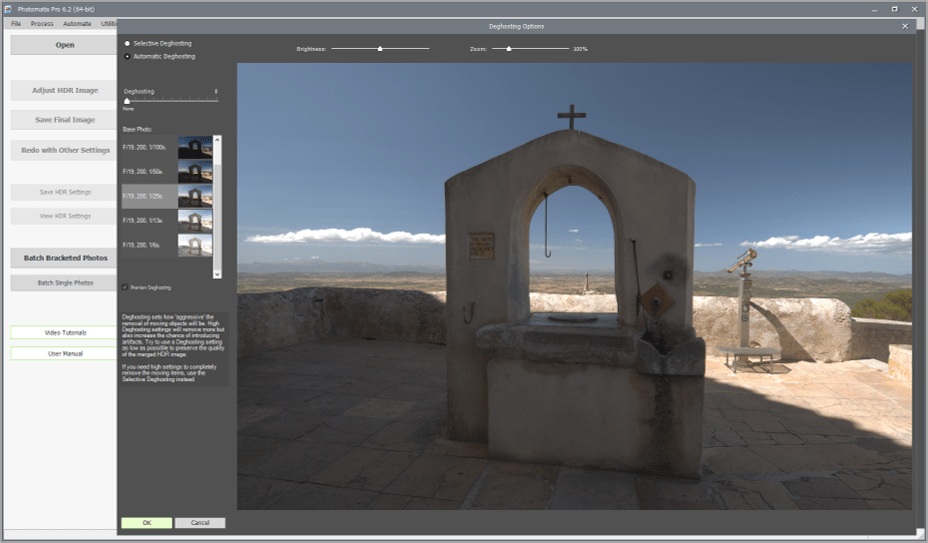
The “Deghosting Options” dialog begins with the choice between “Selective Deghosting” and “Automatic Deghosting”. Automatic well for small ghosts like moving leaves and waves. You should begin by selecting one of the exposures to act as the base for the deghosting and then move the “Deghosting” slider to about 50%. Click through the exposures and check if the ghosts are gone. In case the percentage need to be increase significantly more there is a risk of creating artifacts in the merged image – so in this case you should change to “Selective Deghosting” (which is what HDRsoft recommends). As the name suggests you can then select the area in your image where ghosting occurs.
Merging in Photomatix
When the Photomatix main screen opens, you are presented with the merged HDR image with various settings on the left and various “Styles” to select from on the right.

In my blog post “HDR Part2: What You Need” I already spoke about the different process Photomatix offers to merge your photos. Namely Exposure Fusion and HDR Tone Mapping (Global as well as Local). The pull-down box underneath “HDR SETTINGS” to the left will allow you to select which process or method is to be applied (all will have their specific settings). Note that Details Enhancer, Contrast Optimizer and Tone Balancer belong to the category of local tone mapping and Tone Compressor to the category of global tone mapping.
The best advice here is that unless you are extremely clear on what type of image you envisage the result of the HDR you should simply have a look of the different styles and play around with the settings sliders to the left. While the overall “feel” is important, also observe the more detailed effects on your image with regards to details, contrast, colour as well as noise, halo effects or artifacts.


Using my example image: the Contrast Optimizer method (left image above) provided an overall more natural result with only minor halo effects and artifacts. But besides the colour tone, the stones all appear a bit too smooth… To bring out more detail where there is a lot of texture, the Details Enhancer method (right image above) provided more options. Visible drawbacks are the increase in noise and the appearance of halos around the arch of the well and the bright areas above the clouds. I decided to use the Contrast Optimizer result for the background and the Details Optimizer result for the foreground. This of course meant a further post-processing step in Photoshop, but I simply wanted both – to avoid halos and artifacts in the sky while having a bit more grungy detail in the texture of the stone.
The type of HDR methodology you select will have the greatest impact on halos. Especially with the local tone mapping methodologies Details Enhancer, Contrast Optimizer and Tone Balancer you can expect these to appear – above all with Details Enhancer. But before you avoid these in principle or mentally prepare for long editing sessions in Photoshop, there are a few simple things you should try in Photomatix: These three local tone mapping methodologies will all allow you to adjust Strength and Lighting (or Lighting Effects, Lighting Adjustments, respectively) in the HDR Settings. Try reducing the Strength of the HDR effect and adjusting the Lighting setting slider. Specifically with the Details Enhancer methodology: check the Lighting Effects Mode box and select either “Natural” or “Natural+” modes and also adjust the Smooth Highlights setting. Another thing you should try is to blend with one of the source photos.
Checklist
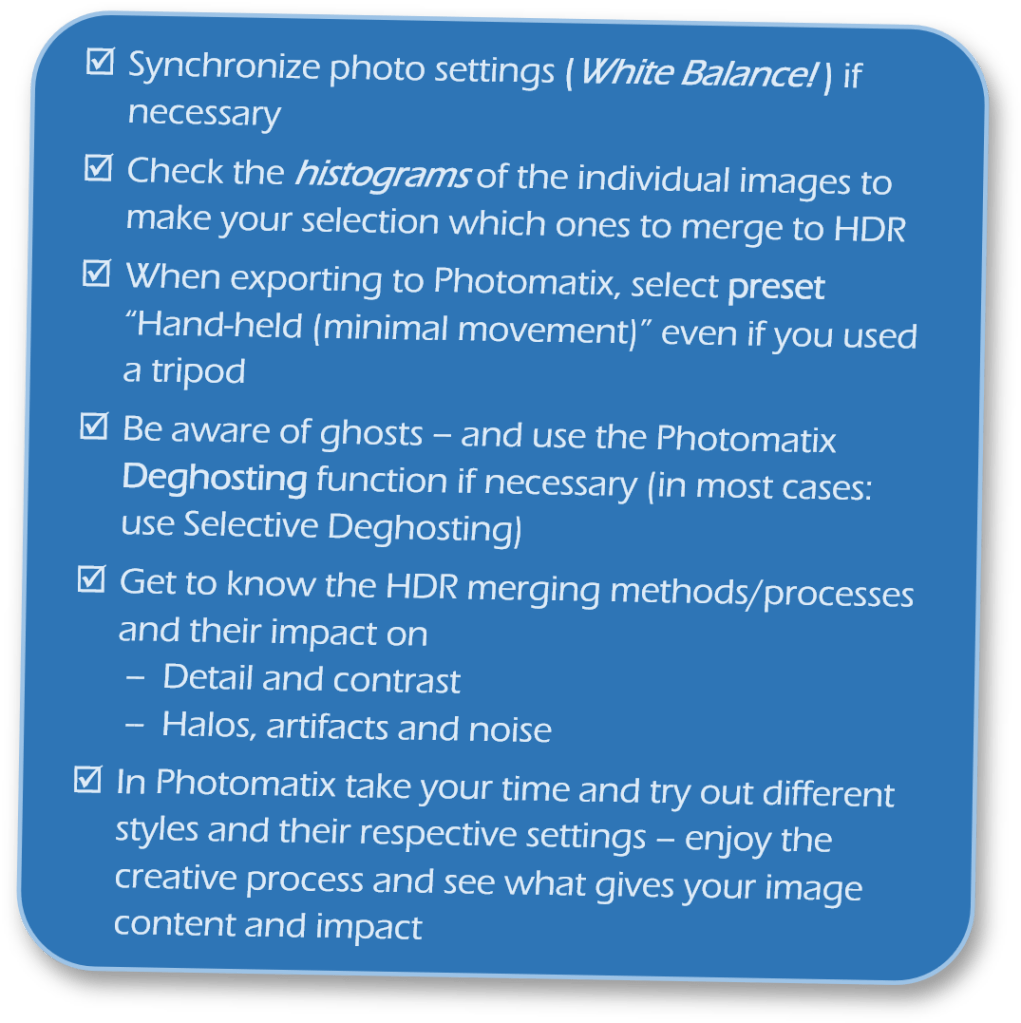
Here a summary of the key points from this part of my HDR workflow series:
Spend time to get to know your HDR software of choice! Photomatix is easy to use, and you will get the hang of all the “styles” and “settings”. So over time you will develop a more focused and efficient approach to create the effect you had in mind… but never forget to experiment at least occasionally !
